Post by Historian on Mar 12, 2009 10:40:30 GMT -5
Sioux Style Lazy Stitch Beadwork
by Steve Nimerfro
Time is of prime importance in doing beadwork. Lazy stitch is not difficult, it just takes time and patience to do it right. Take care in spacing rows, and be patient enough to take out mistakes. But, the actual time spent beading is only half the time needed. An equal amount of time should be spent on research. If you are really serious about producing several items for Sioux dance clothes or for one item, at least read the references cited in this article, examine photos and actual collections. As mentioned above, there is a "Sioux style" of definite colors and geometric design elements--get familiar with it. Examine items to determine design placement, size, direction of lanes, etc. Learn what items were beaded in the lazy stitch style.
TECHNIQUE HINTS
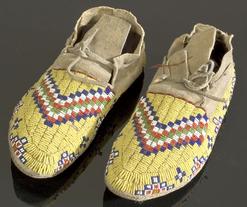
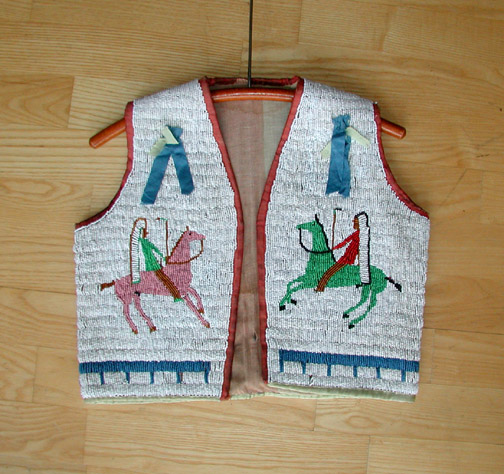
Sioux lazy stitch can usually be recognized by the hard, tight quality of beading. Much, but not all, Sioux lazy stitch has pronounced ridges. The adjacent photos illustrate this description. Use the hints below to achieve this hard, tight quality with ridges. They take practice and time to perfect.
BEADS: Most Sioux work is done in 4/0 Italian beads, not all the old colors are available and substitutes must suffice at times. 11/0 are used if beaded in Czech beads.
(Note: Italian 4/0 seed beads are virtually impossible to find today and are no longer being manufactured. There are many fine old-time colors available in modern Czech beads today.)
1. Thread: If available, sinew is the best. "Harness lace" is also a good substitute and is available from traders. If thread is used, pick one that does not stretch, wax it heavily with bee’s wax, but most importantly pick a heavy enough thread. It should be of sufficient weight so that when doubled it fills the entire hole of the bead, see Fig. 1. In this way the bead can not shift from left to right on the thread. Strip sinew and harness lace to proper thickness to fill hole also. Hard and tight is not achieved by pulling thread super tight, but by thread thickness.
2. Hide: Hard and tight beadwork is a result of a stiff backing. The stiffer parts of an Indian-tanned buckskin hide is ideal. Try to match this when choosing substitutes. Always bead on the side that was next to the meat. Make sure stitches penetrate the center of the hide.
3. Arc: As shown in the photo, an item beaded in lazy stitch fashion is covered with a series of parallel lanes each of which tends to arc a little bit. This arc or hump or ridge is achieved by sewing down 8 beads in a space meant for 7 1/2 beads. Lanes are from 6 - 12 beads in width; with 8 - 9 most common. Lane width will vary in width and number of beads with each beadworker. An even number of beads is quite common.

BEGINNING AND ENDING
The series of illustrations follow the basic beading technique. Draw a base line lightly with a pencil (not pen). The knot at the end of the thread will eventually be hidden under beadwork. Do not leave knots on the back side of the leather.
Fig. 2 shows proper way to punch leather with awl. Stitches must catch 1/2 the hide or they will pull out. If not using Indian tanned buckskin, proper penetration cannot be achieved without an awl. Awl must be ground down to size of large needle or use a heavy needle glued in a piece of dowel as in Fig. 3.
To start: knot thread, punch through leather, pull thread on needle through holes and string on 8 beads, Fig. 4. As 8 beads lie next to each other on a line perpendicular to base line, punch next pair of holes ½ bead short of distance spanned by 8 beads, Fig. 4.
Next, pull needle and thread through; pull taught and string on 8. Beads should just barely touch first row. Spacing here is critical, you must avoid bunching and gapping, Figs. 6—8. You will learn spacing with practice. Rip out your mistakes as you go; remember, patience. When you come to the end of a thread, tie it off and sew back under the lane. No knots should show on front or back!!
Figure 5 shows placement of second lane. Beads of first lane may touch those of second, but they dont have too. Stitches of second lane should be right next to those of first but not interlocking. In design area rows should line up but need not in background area.
References:
Native American Beadwork by Georg Barth

Quill and Beadwork of the Western Sioux by Carrie A Lyford

The Complete Guide to Traditional Native American Beadwork by Joel Monture

The Technique of North American Indian Beadwork by Monte Smith

********************************************
Examples:


by Steve Nimerfro
Time is of prime importance in doing beadwork. Lazy stitch is not difficult, it just takes time and patience to do it right. Take care in spacing rows, and be patient enough to take out mistakes. But, the actual time spent beading is only half the time needed. An equal amount of time should be spent on research. If you are really serious about producing several items for Sioux dance clothes or for one item, at least read the references cited in this article, examine photos and actual collections. As mentioned above, there is a "Sioux style" of definite colors and geometric design elements--get familiar with it. Examine items to determine design placement, size, direction of lanes, etc. Learn what items were beaded in the lazy stitch style.
TECHNIQUE HINTS
Sioux lazy stitch can usually be recognized by the hard, tight quality of beading. Much, but not all, Sioux lazy stitch has pronounced ridges. The adjacent photos illustrate this description. Use the hints below to achieve this hard, tight quality with ridges. They take practice and time to perfect.
BEADS: Most Sioux work is done in 4/0 Italian beads, not all the old colors are available and substitutes must suffice at times. 11/0 are used if beaded in Czech beads.
(Note: Italian 4/0 seed beads are virtually impossible to find today and are no longer being manufactured. There are many fine old-time colors available in modern Czech beads today.)
1. Thread: If available, sinew is the best. "Harness lace" is also a good substitute and is available from traders. If thread is used, pick one that does not stretch, wax it heavily with bee’s wax, but most importantly pick a heavy enough thread. It should be of sufficient weight so that when doubled it fills the entire hole of the bead, see Fig. 1. In this way the bead can not shift from left to right on the thread. Strip sinew and harness lace to proper thickness to fill hole also. Hard and tight is not achieved by pulling thread super tight, but by thread thickness.
2. Hide: Hard and tight beadwork is a result of a stiff backing. The stiffer parts of an Indian-tanned buckskin hide is ideal. Try to match this when choosing substitutes. Always bead on the side that was next to the meat. Make sure stitches penetrate the center of the hide.
3. Arc: As shown in the photo, an item beaded in lazy stitch fashion is covered with a series of parallel lanes each of which tends to arc a little bit. This arc or hump or ridge is achieved by sewing down 8 beads in a space meant for 7 1/2 beads. Lanes are from 6 - 12 beads in width; with 8 - 9 most common. Lane width will vary in width and number of beads with each beadworker. An even number of beads is quite common.

BEGINNING AND ENDING
The series of illustrations follow the basic beading technique. Draw a base line lightly with a pencil (not pen). The knot at the end of the thread will eventually be hidden under beadwork. Do not leave knots on the back side of the leather.
Fig. 2 shows proper way to punch leather with awl. Stitches must catch 1/2 the hide or they will pull out. If not using Indian tanned buckskin, proper penetration cannot be achieved without an awl. Awl must be ground down to size of large needle or use a heavy needle glued in a piece of dowel as in Fig. 3.
To start: knot thread, punch through leather, pull thread on needle through holes and string on 8 beads, Fig. 4. As 8 beads lie next to each other on a line perpendicular to base line, punch next pair of holes ½ bead short of distance spanned by 8 beads, Fig. 4.
Next, pull needle and thread through; pull taught and string on 8. Beads should just barely touch first row. Spacing here is critical, you must avoid bunching and gapping, Figs. 6—8. You will learn spacing with practice. Rip out your mistakes as you go; remember, patience. When you come to the end of a thread, tie it off and sew back under the lane. No knots should show on front or back!!
Figure 5 shows placement of second lane. Beads of first lane may touch those of second, but they dont have too. Stitches of second lane should be right next to those of first but not interlocking. In design area rows should line up but need not in background area.
References:
Native American Beadwork by Georg Barth

Quill and Beadwork of the Western Sioux by Carrie A Lyford

The Complete Guide to Traditional Native American Beadwork by Joel Monture

The Technique of North American Indian Beadwork by Monte Smith

********************************************
Examples:


